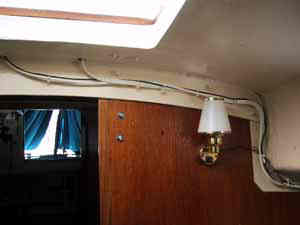
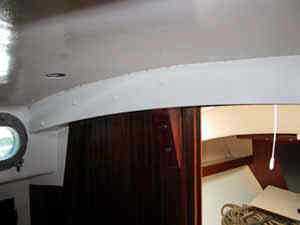
The glue that Whitby used to laminate the beams gives up over time and the beam itself delaminates causing it to crack [sometimes dramatically] and happens mostly to boats that are raced hard in heavy weather with excessive amounts of sail. But the beam can crack even in a "cruised only" boat once the glue gives up.
Those who want to maintain the orginal look of a wooden beam can build a new one and replace the original. See Jeff Fongemie's repair of SeaGrass for instructions on this approach.
When the beams first started failing on racing boats with a lot of tension on the rigging, Bob Marshall came up with a rolled aluminum beam to sister the wooden beam. Not a bad try, but sistering one side generally proved not quite adequate over time. Bruce Rankin, an engineering professor at the Naval Academy, designed a better fix. This was a pair of aluminum plates, sistered on each side of the beam. I don't know of a single case where this has failed.
I'm not a structural engineer, but I'd bet that a combination of the two plates epoxied to the beam and through-bolted to each other will provide plenty of strength. Bruce Rankin developed this fix and I have great faith in his engineering abilities. This cure has been done on well over 100 boats, and no part of the procedure is technically demanding, just a little messy at times.
Jack up the Beam

First, loosen the standing rigging, especially the shrouds, to give room to move.
Jack the beam into position using a house jack or the like, through the opening in the cabin sole to bear on the keel (not the cabin sole).
You could squirt some epoxy between the delaminated pieces before jacking up the beam, if you want. I can't see how it would hurt. If the beam has deflected to the point where it takes days to gradually get the beam back into position, relaminating the wood may not be an option. It must be correspondingly jacked when installed, you can drill the holes through the beam with the brace in final position.
Procure the Aluminum Plates

Once the beam is in the appropriate position, make a paper or cardboard pattern of the shape and size the plates should be. The plates should be 3/8" thick 6061 grade aluminum, cut to fit the curve of the beam.
Or, rather than starting with drawing your own templates for the aluminum, you can contact one of these companies which have already digitized the shape. These companies use a water-jet cutting process that results in a very clean cut.
In the USA:
- Washington Aluminum Company
- 1330 Knecht Avenue
- Halethorpe, MD 21227
- 410-242-1000 extension 301 ask for Kirk
In Canada:
- RCI Waterjet Cutting Service
- 6275 Netherhart Road
- Mississauga, Ontario
- Canada L5T 1A2
- (905) 564-1842
- 1-800-RCI-CUTS (1-800-724-2887)
- waterjet@rciwaterjets.com
- 905-670-7796 (fax)
The Washington Aluminum Company makes the plates from 6061 grade aluminum using a computerized water jet cutting process and therefore a very even cut. I installed them, and found that I had to do some "final fit" like rounding edges and corners.
This was done easily with a 3" belt sander (others have used a 3-1/2 inch angle grinder, which also can be used to cut off bolts). They have the exact template on file for the Alberg Fix. It took three days for them to ship to me here in Chicago. The number there is 410-242-1000. Dial extension 301 and ask for Kirk. No point in reinventing the wheel here. Cost was $257 including shipping to Chicago. (Update, in early 2005 the price was reported as $295.)
Installing the Plates
Some installations use a series of through bolts through the new plate;some just use the existing bolts (the holes) on either end of the beam-usually going up one size in diameter. Predrill one of the plates off the boat. This will prevent 'dimpling' which can diminish the flush fit. prepare the surface of the wood beam and score the aluminum plates to take a good coat of West epoxy prior to clamping. Our hole placement was determined by guestimation.. I placed the majority of the bolts through the center of the beam (high and low). Using a drill press to predrill the first plate makes an effective template when later using a hand drill to run through the existing beam to the second plate. Make sure that there is clearance from the top of the plate to the underside of the deck, to avoid deck cracking when the beam flexes under load. That space can later be filled with silicone caulking.


I ran out to the edge of the plate as far as I could and still get the drill to go through . Important equipment was the 14" drill bit, brand name "The Aggressor." Total of 10 holes and bolts. I used 1/4 inch stainless steel bolts with hex nuts. Using cap nuts makes for a more finished look, but the bolts will have to be cut off after installation. Using bolts also makes convenient studs to mount wire straps on. Others have used 6 inch shouldered bolts, but the thread needed to be run down an extra 1/4 inch or so. If you are going to cut off the bolts, run a regular nut down the thread first, so if the thread gets buggered, taking the nut off will straighten it out.
I coated the beam with West System Epoxy with 407 to increase the bond before bolting everything together while the epoxy was still wet. I use the two-part West System etching solution on the aluminum to improve the bond with the epoxy.
This procedure covers up the numbers on the main beam required for documented boats, They will need to be permanently etched into the new aluminum.
Issues
The only time you need worry about stainless/aluminum corossion to any degree is when the parts are in contact with saltwater, usually, hopefully, that's outside the boat. To minimize this I always use a sealant, caulking, when assembling aluminum parts with stainless bolts on the exterior of the boat.
Corrosion due to dissimilar metals will occur any time the metals are in contact; the corrosion will simply happen more slowly in a dry(er) environment. There are several things you can do, none of them good--like use nylon washers and bushings to separate the metals, or use a corrosion inhibitor. In any case, the aluminum will corrode visibly first. The stainless will also corrode--but you will have trouble seeing it.
Well, there has to be some moisture (or something equivalent) for the ion transfer that results in the corrosion. I think that if you keep the beam dry, you won't have any significant problems. Painting it will also help, as well as make it look better.
Authorship
This page is an edited compilation of discussions relating to deck beam problems from the public-list server. People who have contributed:
- Joe Tokarz, #499 "One Less Traveled"
- Tom Swift, #222
- Dan Sternglass, Watcher of the Skies, #201
- Mike Lehman, #505
- Mike Grosh, #220
Other descriptions
Randy Katz has written up in detail his repair to Simple Gifts where he converted a single-sister repair to double sistering.
I hope that these descriptions help demystify the procedure for you.
- Wooden Mast Beam on the older boats
- Supporting the Mast on the newer boats
- Detailed repair of Simple Gifts
- Deck Repairs
- Small Boat Patch
- Mast Beam
- Mast Step Deck Repairs
- Newer Hull Deck Joint
- Newer Taffrail
- Replacing Windows
- Adding Opening Ports
- Opening Port Gaskets
- Teak Hatch And Dropboards
- Cockpit Coamings
- Winter Cover
- Boarding Ladders
- Rub Rail
- Awlgrip
- Boat Maintenance
- Spars, Sails & Rigging
- Hull & Deck
- Deck Gear
- Steering
- Mechanical Propulsion
- Electrical
- Head
- Plumbing
- Accomodations
- Tools
- disorganized


