Replacing the Atomic 4 with an "exact replacement diesel" in the newer Alberg 30First, there isn't anything such as an exact replacement. You can get close and this will minimize the amount of modifications you need to make, or you can plan to change the engine bed and be free to choose whatever engine your heart desires. Having a professional change the engine bed costs about $2000 according to the quotes received from the firms in Annapolis a few years ago. If you want to do the replacement yourself, but don't feel comfortable with building a new engine bed, look for an "exact replacement" instead and plan to make some minor modifications. This does not apply to the older (pre liner) Albergs. On the older boats, you will need to replace the engine bed regardless of the type of engine you choose. On the newer boats (with liners) the engine bed was designed with the Atomic 4 in mind. The Atomic 4 was "hard mounted" to the boat with pieces of rubber (now compressed and hard as bricks) between the engine and the boat to absorb vibration. A new diesel will come with flexible motor mounts as seen in the pictures. Here are some tricks to help make the installation easier. First: the new engine should have the same mounting dimensions as the Atomic 4. The critical dimensions are:
The most critical part of an engine replacement is the new engine alignment
with the prop shaft. The tolerance on this is .004" maximum. This
measurement is taken between the engine flange and the shaft flange. It is
in two planes, vertical and horizontal. It is crucial to get this alignment
as close as possible to eliminate vibration and wear. Also, since the new
diesel is mounted on flexible mounts, this angle will change when the engine
is placed under load and the shaft exerts forward force on the engine while
in gear and pushes the engine forward thus changing the angle. To compensate
for this, a good quality flexible coupling should be used between the engine
and shaft flanges. Assuming that Whitby Boat Works spent a lot of time on
this and "got it right", the new engine mounts should be exactly over the
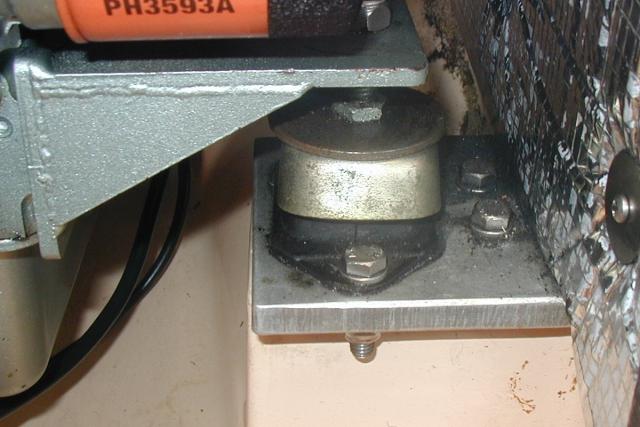
There is adequate space to install the new mounts to the rear bed. On the
front mounts the procedure is the same, however, due to the size of the
mounting "pillars", the flexible motor mounts need to be oriented
fore-and-aft. (See photos). Mount a piece of 1/2" 6061 aluminum on top of the
"pillar" to increase the mounting area for the flexible mount. A couple of
counter sunk flat head SS bolts and 5200 will hold the aluminum plates
firmly in place.
With the four flex mounts securely installed, now all you need to do is set the engine over the bolts in the flex mounts. The only adjustment necessary for proper alignment is vertical. For final adjustments, and piece of mind, have a professional mechanic, one you trust, perform the final alignment. Hook up fuel, wires and engine controls and you are ready to go.
Mike Lehman Please support these businesses that support the Alberg 30 Association: 


|
|