|
Last month we discussed design considerations for building a bowsprit/anchor roller for the A30. Inspired by two previous designs for bowsprits, I created my own variation. The bowsprit on #499 "One Less Traveled" would include the following features: 1) center aligned on the bow, 2) strong enough for a man to stand on, 3) wider than 9".
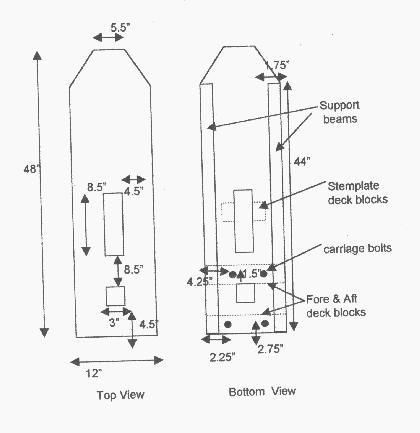
To begin construction of your bowsprit, start with a 3/4" thick piece of mahogany, approximately 12" wide and 48" long. Cut two holes in the board according to figure 1. Also cut the forward most corners of the board at 45 degree angles. The two holes cut in the board will serve as the chain pipe hole, and the stem fitting hole, respectively. The stem fitting hole will ultimately allow access to the jip shackle and the forestay turnbuckle, etc. Use a 3/8" roundover bit to route the all the edges of the main board. Next, using scrap, mahogany, create two 44"x 1 3/4" x 1 1/4" mahogany support beams. These support beams with add strength to the bowsprit, and are what allows you to stand on the main board without it breaking. Fasten the two support beams to the outer most port and starboard edges--about 1/2" from the edge, on the underside, using #8 1 1/14" stainless steel sheet metal screws. Fasten them from the top of the main board down into the support beams. Don't worry the heads of the screws will be covered by trim later on. Next, apply one coat of varnish or Sikens to the assembled main board and support beams. While that is drying, cut your trim stock frrom scrap mahogany. Begin by ripping a 3/4" thick board of mahogany into approximately 1/4" wide trim stock that is 48" long. You will need approximately 12-13 pieces of trim stock, 3/4" x 1/4" x 48". When the main board has driedfrom its first coat of varnish, begin to lay out your trim stock.
Start with a frame around the top edge of the main board. Use a simple miter box to cut precise angles; all trim pieces should fit flush to one another. Use temporary spring clamps to hold the outer frame trim in place, while you measure and cut the remaining trim pieces. These will run the length of the main board, fore and aft. The trickiest angle is the absolute forward cut, because it should be flush again the frame edge. Remember to leave room at the aft end of the main board for the carriage bolts that will ultimately mount the bowsprit to the deck. Drill the carriage bolt holes according to figure 1. Before attaching the trim stock, apply one coat of varnish to the main board and trim stock separately.
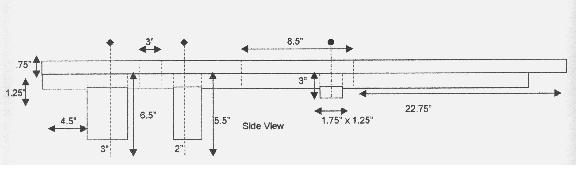
Next begin to attach the trim stock to the top of the main board. Start with the outer frame, then assemble one trim piece per side, working towards the center, this will insure even spacing of the trim stock. Attach the trim stock with #6 3/4" stainless steel sheet metal screws. You must counter sink the screws slightly or you will split the trim stock. Make sure the screws of the inboard trim stock align with the screws in the outer frame. Use a lot of screws, approximately 120 will do the job. Lightly sand, and apply another coat of varnish to the assembled bowsprit. When the trim stock is completely installed, prepare your mounting blocks. There are two large mounting blocks aft (total of four holes), and a set of smaller mounting blocks forward around the stem fitting hole. The aft blocks will be bolted with carriage bolts to the deck. The forward set of blocks will simply rest on the stem fitting snuggly. The aft most mounting block is approximately 6 1/2" tall, and 3" thick. The forward mounting block is 5 1/2" tall and 2" thick. If you can fabricate the mounting blocks out of one piece of mahogany, you will save yourself a lot of time. If not, try 1" thick mahogany planking, cut to size and laminated together until the desired height is reached. The difference in the heights of the two mounting blocks takes into consideration the rise of the deck and the stem fitting alignment. Remember to cut out the width of the support beams on either top side of the mounting blocks to ensure a snug fit flush against the underside of the main board. The galvanized carriage bolts used are 1/2" x 10" long, with 1" washers. When mounting be sure to use appropriate backing plate material.
The set of smaller mounting blocks forward are 3" tall, 1 1/4" x 1 3/4". They will be screwed into place using #8 1 1/4 " stainless steel sheet metal screws. Although you may have to remove some trim to assemble, you should be able to hide the heads of the screws under the existing trim stock. Finally, apply several more coats of varnish to the entire bowsprit and mounting blocks separately. Then attach your choice of after market bow roller to the bowsprit main board. I chose the Windline Marine Model AR-3, and mounted it with 2" long 3/8" hex bolts through an extra piece of 1/4" thick, 7" x 2" mahogany, to act as a mounting board for the base of the bow roller. You can also attach two 2" pad eyes aft of the carriage bolt mounting locations. A bungee cord can be attached to these to control a doused headsail.
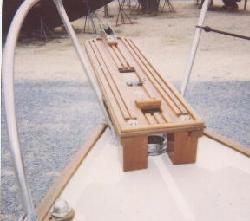
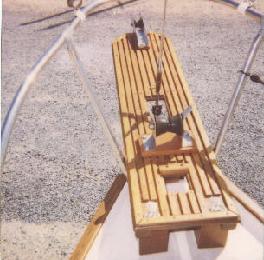
The result should look something like these photos. Please support these businesses that support the Alberg 30 Association: 


|
|